
As a professional tradesman, I’m often called out to fix mastic jobs that haven’t gone to plan. In most cases, the homeowner wasn’t careless — they were simply trying to save money or take on a small job themselves. That’s completely understandable.
However, mastic is one of those jobs that looks easy but can quietly cause serious problems if it’s done incorrectly. Water ingress, mould, and damaged surfaces are all things I see regularly from failed DIY sealing.
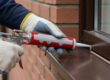
If you’ve decided to DIY your mastic — or can’t afford a professional right now — here are some honest, practical tips to help you avoid the most common mistakes I see every week.
Use the Right Sealant for the Job
One of the biggest issues I’m asked to fix is the wrong type of sealant being used. Bathroom silicone, paintable caulk, and exterior mastics all behave very differently.
Using the wrong product can lead to cracking, peeling, or mould growth within weeks.
As a general guide:
- Silicone sealant for bathrooms and kitchens
- Paintable acrylic caulk for indoor gaps and trim
- Exterior mastic for windows, doors, and outdoor joints
A standard tube usually covers 10–12 linear metres with a small bead. It’s best to tackle similar areas at the same time and avoid storing open tubes, as sealant rarely keeps well once opened.
Remove Old Mastic Properly
Applying new mastic over old, mouldy, or loose sealant never works long-term. It may look fine on day one, but it won’t bond properly and will fail sooner rather than later.
Taking the extra time to remove the old mastic completely will save you time and money in the long run.
Prep Is Not Optional
Clean, dry surfaces are essential for a successful seal. Moisture, soap residue, grease, or dust will prevent mastic from sticking properly.
Many of the failed jobs I repair could have been avoided with just five extra minutes of proper cleaning and drying.
Less Mastic Means More Control
Cut the nozzle smaller than you think you need. Applying too much sealant leads to mess, uneven lines, and weak edges that are more likely to peel away.
A neat, thin bead not only looks better — it usually lasts longer too.
Let It Cure Fully
This is a big one. Using a shower, bath, or window before the mastic has fully cured breaks the seal before it’s had a chance to do its job.
That’s when water gets behind the sealant — and that’s when damage starts. Always follow the manufacturer’s curing times, even if it looks dry on the surface.
When to Call a Professional
DIY mastic is perfectly fine for small, straightforward jobs. However, if:
- The seal keeps cracking
- There’s noticeable movement in the area
- Water damage has already started
That’s usually when I’m called in — and by that point, the repair often costs more than having it done properly in the first place.
A Final Word From the Trade
There’s nothing wrong with DIY when it’s done carefully. My advice is simple: take your time, use the right materials, and don’t cut corners.
And if something doesn’t go right, get it checked early. Fixing failed mastic is always cheaper than repairing the damage it can cause later.